
Craft rooms are known for bursting with creativity but they often hide a surprising secret. The average crafter owns over 70 different types of supplies and most struggle to find what they need when inspiration strikes. Most people think the real challenge is not having enough space but the biggest obstacle is often not knowing what you actually have scattered in forgotten drawers and bins.
Table of Contents
- Step 1: Assess Your Current Supply Situation
- Step 2: Sort Craft Supplies By Category
- Step 3: Choose The Right Storage Solutions
- Step 4: Implement A Logical Organization System
- Step 5: Label And Maintain Your Craft Area
Quick Summary
| Key Point | Explanation |
|---|---|
| 1. Assess Your Current Supply | Start with a complete evaluation of your craft supplies, sorting and categorizing what you keep, donate, or discard. |
| 2. Sort Supplies by Category | Create organized categories for your craft materials to enhance workflow and reduce chaos in your workspace. |
| 3. Choose Effective Storage Solutions | Implement appropriate storage options like vertical shelving and labeled bins to maximize space and efficiency. |
| 4. Implement a Logical Organization System | Develop a systematic method for locating supplies easily, including color coding and strategic grouping by use. |
| 5. Maintain and Label Everything | Establish a regular maintenance routine and an efficient labeling system to keep your craft area organized and functional. |
Step 1: Assess Your Current Supply Situation
Organizing craft supplies begins with a comprehensive and honest assessment of your current collection. This critical first step sets the foundation for creating a functional and stylish workspace that maximizes efficiency and creativity. Many crafters accumulate materials over time without realizing how quickly supplies can become overwhelming and disorganized.
Start by clearing a large, flat surface like a dining table or clean floor where you can spread out all your craft supplies. Pull everything from storage areas, drawers, shelves, and hidden corners. This complete inventory process helps you understand the true volume of materials you own.
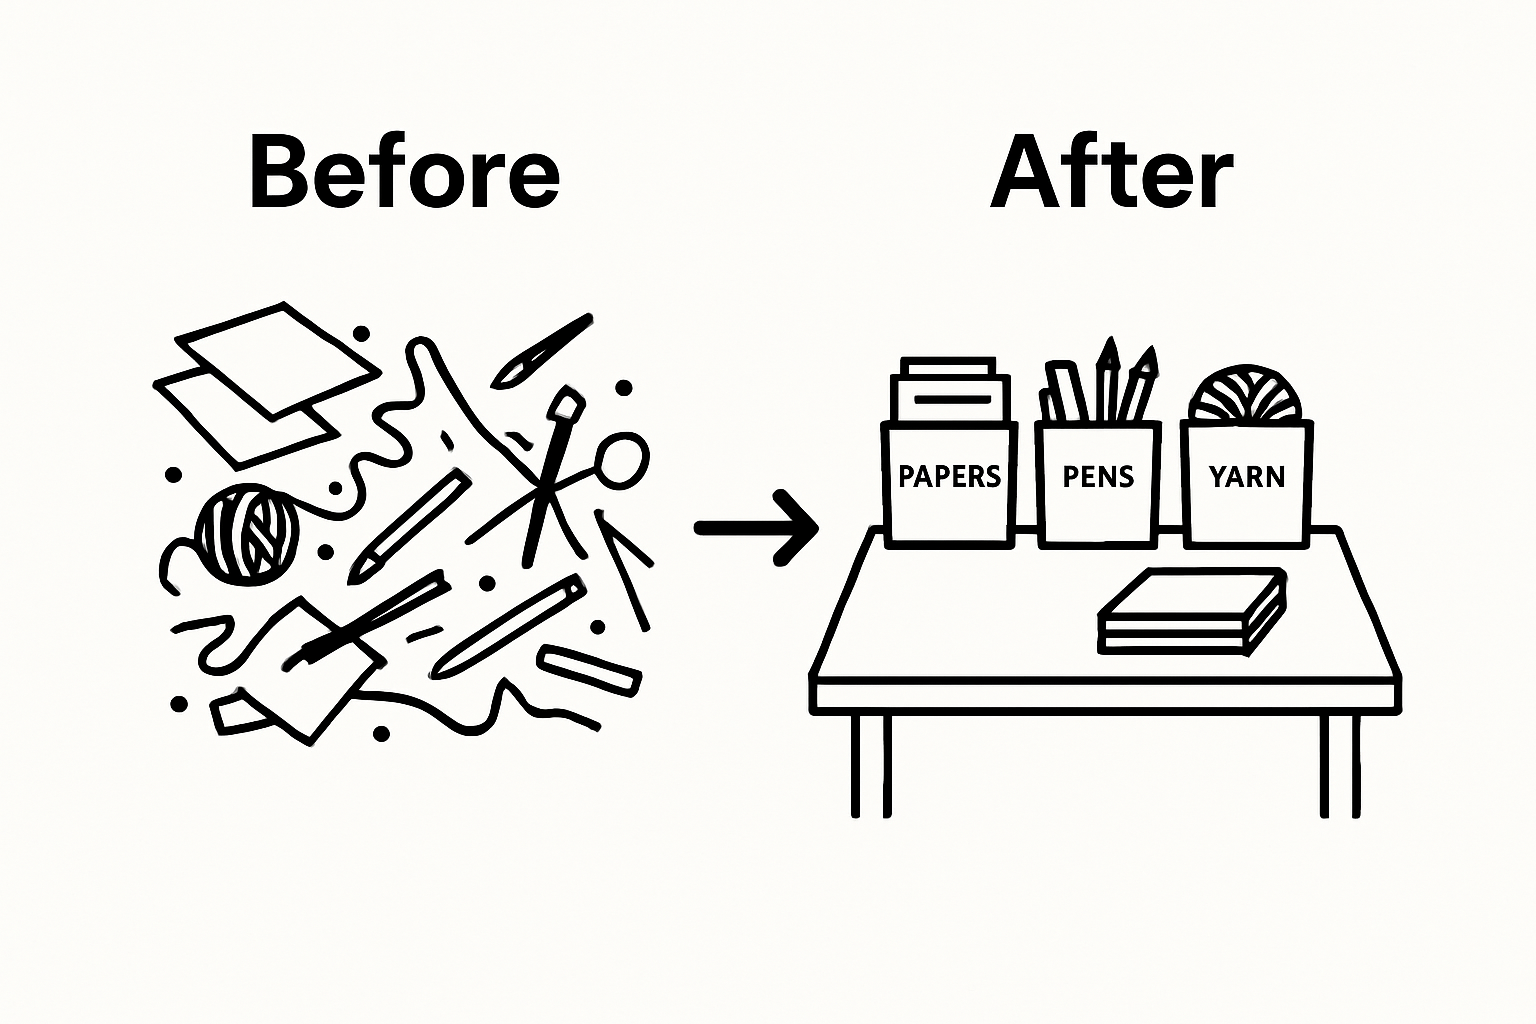 Sort items into broad categories such as paper crafts, painting supplies, sewing materials, and jewelry making tools. As you sort, create separate piles for items you want to keep, donate, or discard.
Carefully examine each item during this assessment. Check for expired or dried out materials like old glue, hardened paint, or deteriorating fabrics. Craft supplies have limited shelf lives, and holding onto unusable items wastes valuable storage space. Consider the condition, frequency of use, and emotional attachment to each item. Be ruthless but practical in your evaluation. If you have not used a specific supply in the past year and it does not hold significant sentimental value, it might be time to let it go.
Measure and document your total supply inventory. Count how many containers, types of materials, and specific tools you own. This documentation serves two important purposes: it helps you understand your current crafting needs and prevents future over purchasing. Create a simple spreadsheet or use a note taking app to track your inventory. For those who want more detailed organization strategies, consider photographing your supplies to create a visual catalog.
Finally, assess your workspace and available storage. Measure the dimensions of your craft area, noting available wall space, shelf depth, and potential storage zones. Understanding your physical space constraints will guide subsequent organization decisions, ensuring you create a system that fits your specific environment and crafting style.
Step 2: Sort Craft Supplies by Category
After completing your initial inventory assessment, the next crucial step is systematically sorting your craft supplies into logical categories. This organizational strategy transforms a chaotic collection into a streamlined system that enhances creativity and reduces frustration. The goal is to create intuitive groupings that make sense for your specific crafting style and workflow.
Begin by establishing broad categories that reflect your primary crafting activities. Typical craft supply categories might include paper crafts, painting, sewing, jewelry making, knitting, scrapbooking, and mixed media projects. Within each category, create subcategories that further refine your organizational approach. For instance, under the painting category, you might have subcategories like watercolors, acrylics, brushes, canvases, and painting tools. Use clear, spacious work surfaces and invest in sorting containers or large trays to help manage this process effectively.
As you sort, be intentional about evaluating each item’s condition and relevance. Some supplies might span multiple categories, so consider creating a flexible “multi purpose” group for versatile materials. Color coding or using translucent storage bins can help visually distinguish between different craft categories. For crafters with limited space, explore compact organization solutions that maximize vertical storage and minimize clutter.
Pay special attention to small items like beads, buttons, threads, and embellishments. These tiny supplies can quickly become overwhelming if not managed properly. Consider using compartmentalized storage boxes, magnetic boards, or clear plastic containers with adjustable dividers. Label everything meticulously to ensure you can quickly locate specific supplies when inspiration strikes. Remember that an effective sorting system is not just about current needs but also about anticipating future creative projects and maintaining an adaptable workspace.
Complete your sorting by creating a master inventory list that documents each category and its contents. This documentation serves as a valuable reference point, preventing duplicate purchases and helping you track your craft supply collection over time. A well organized craft space is not just about tidiness it is about creating an environment that nurtures creativity and makes crafting a joyful, stress free experience.
Step 3: Choose the Right Storage Solutions
Selecting the appropriate storage solutions transforms your craft space from cluttered to curated, turning organization into an art form itself. The right storage system not only preserves your supplies but also enhances your creative workflow and workspace aesthetics. Your goal is to find solutions that balance functionality, accessibility, and visual appeal.
Vertical storage becomes your secret weapon in maximizing limited craft space. Consider investing in adjustable shelving units, pegboards, wall mounted racks, and hanging organizers that utilize often overlooked wall surfaces. These solutions keep supplies visible, within reach, and prevent valuable workspace from being consumed by storage containers. Transparent or semi transparent containers with secure lids work exceptionally well for smaller items like buttons, beads, and embellishments. Look for stackable options that can be easily labeled and rearranged as your craft collection evolves.
Different craft supplies demand different storage approaches. Fabric crafters might benefit from roll out drawers or fabric specific hanging systems, while painters could use tiered paint rack organizers that display colors and keep brushes accessible. For paper crafts, consider vertical file holders, magazine style racks, or expandable portfolios that protect delicate materials from dust and damage. Explore our comprehensive organization guides to find innovative solutions tailored to specific crafting needs.
When selecting storage containers, prioritize durability and adaptability. Opt for containers made from sturdy materials like clear polypropylene, metal wire baskets, or wooden boxes with removable dividers. Modular storage systems that can be reconfigured offer flexibility as your crafting interests and supply collection change over time. Consider the weight of your supplies and choose containers with reinforced handles and secure closures. Color coordinate or choose neutral tones that complement your workspace aesthetic, transforming storage from a purely functional element to a design feature.
The ultimate test of your storage solution is its daily usability. After implementing your new organization system, assess how intuitive it feels. Can you quickly locate and access supplies? Do the storage solutions protect your materials from dust, moisture, and potential damage? A truly effective craft supply storage system should feel like an extension of your creative process, reducing frustration and inspiring spontaneous creativity.
Below is a table summarizing different craft supply storage solutions, their best-use cases, and recommended materials to help you choose the right options for your space.
| Storage Solution | Best For | Recommended Material/Type |
|---|---|---|
| Vertical Shelving | Maximizing floor space | Adjustable wood or metal shelves |
| Pegboards & Wall Racks | Keeping tools visible and accessible | Metal pegboard, wall-mounted racks |
| Hanging Organizers | Small supplies and light tools | Fabric or mesh hanging pockets |
| Clear Stackable Containers | Beads, small embellishments | Transparent polypropylene |
| Rolling Carts | Flexible, movable organization | Metal or sturdy plastic |
| Drawer Dividers | Separating tools and accessories | Wood or plastic adjustable dividers |
| File Holders/Magazines | Paper, cardstock, flat items | Vertical office file holders |
| Compartment Boxes | Buttons, threads, tiny pieces | Plastic boxes with dividers |
Step 4: Implement a Logical Organization System
Implementing a logical organization system transforms your craft space from chaotic to strategic, creating an environment that supports creativity and efficiency. The key is developing a systematic approach that makes sense for your specific crafting style and workflow. Think of this process as designing a personal craft supply ecosystem where every item has a designated home and can be easily retrieved when inspiration strikes.
Color coding and labeling become your organizational superheroes. Develop a consistent labeling system that works across your entire craft space. Use color coded labels, clear typography, and consider adding small icons or symbols that quickly communicate the contents of each container. Digital label makers can help create professional looking labels, but handwritten labels with permanent markers work equally well. Group similar supplies together not just by type, but also by frequency of use. Frequently used items should occupy prime real estate in your workspace, while occasional supplies can be stored in slightly less accessible locations.
Create a zonal organization strategy that mirrors your creative process. Establish dedicated work zones for different crafting activities, ensuring that supplies for each zone are stored nearby. For painters, this might mean having an easel area with painting supplies within arm’s reach. Scrapbookers could design a layout zone with paper, embellishments, and cutting tools clustered conveniently. Explore innovative organization techniques that can help you streamline your craft space and enhance your creative workflow.
Maintain flexibility in your organization system, recognizing that your crafting needs will evolve over time. Invest in adjustable storage solutions like modular shelving units, rolling carts with removable containers, and expandable drawer systems. These adaptable storage options allow you to reconfigure your space as your craft supplies and interests change.
Conduct periodic reviews of your organization system every six months, assessing what works, what doesn’t, and making incremental improvements.
The ultimate test of a successful organization system is its intuitiveness and ease of use. After implementing your new system, observe how naturally you can locate and return supplies. If you find yourself consistently struggling to find items or return them to their designated spaces, it is time to refine your approach. A truly effective craft supply organization system should feel like an extension of your creative process, reducing frustration and inspiring spontaneous creativity.
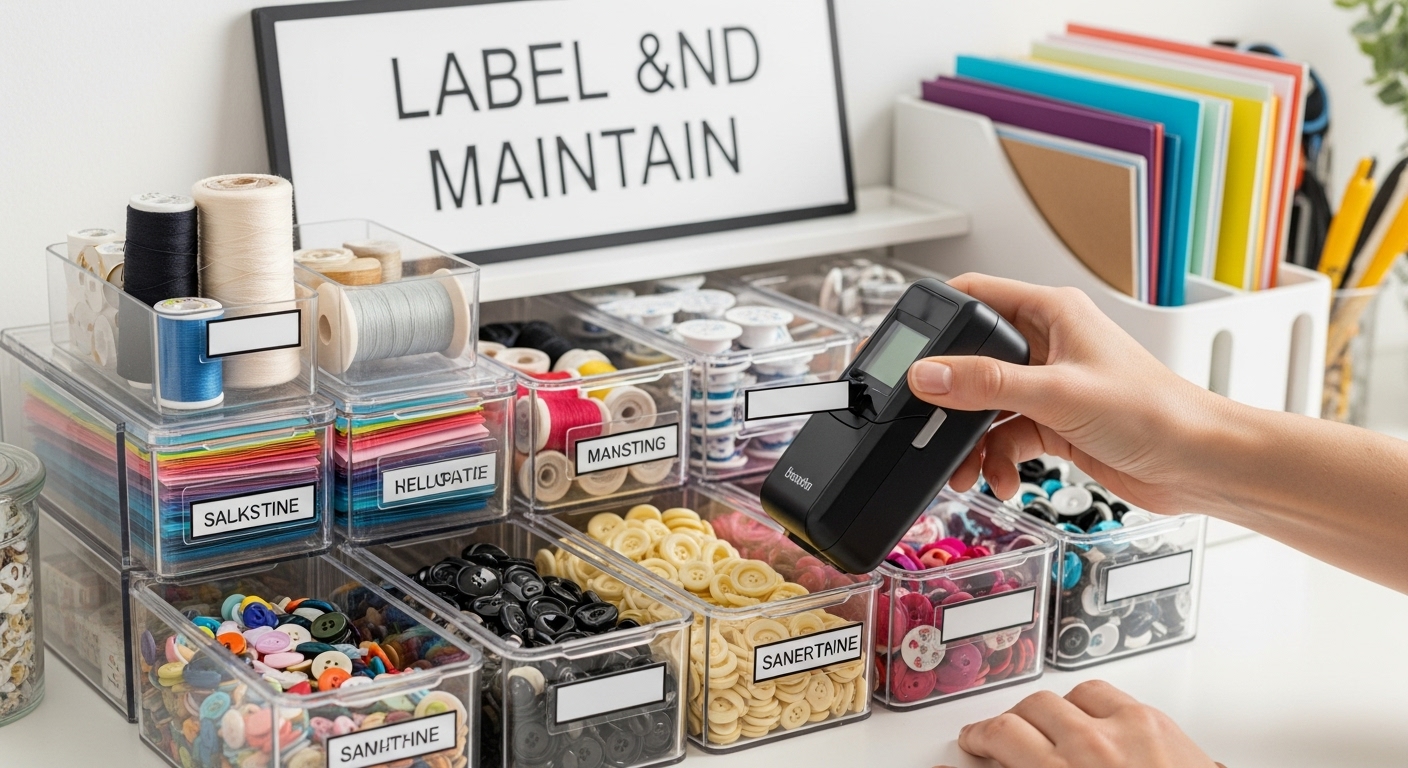
Step 5: Label and Maintain Your Craft Area
Labeling and maintaining your newly organized craft area transforms a one time organization project into a sustainable system that supports your creative journey. This final step is about creating lasting structure and developing habits that keep your craft space functional, stylish, and inspirational. Think of maintenance as ongoing care that preserves the organizational momentum you have already built.
Invest in high quality, durable labeling tools that will withstand frequent handling and potential craft material exposure. Choose label makers with waterproof or laminated labels, or invest in a thermal printer that creates professional looking tags. Create a consistent labeling system that includes not just the category of supplies, but potentially additional details like color, size, or purchase date. For transparent containers, consider using removable vinyl labels that can be easily updated as your craft collection evolves. Color coding can provide an additional visual layer of organization, making it easier to quickly identify and retrieve specific supply groups.
Establish a routine maintenance schedule that prevents organizational backsliding. Set aside 15 minutes at the end of each crafting session to return items to their designated spaces. This small investment of time prevents the gradual accumulation of clutter that can quickly overwhelm your carefully designed system. Explore our daily organization strategies to help you develop consistent habits that keep your craft area pristine. Consider creating a quick cleanup checklist that becomes second nature, ensuring every crafting session ends with your space reset and ready for the next creative burst.
Regularly reassess and adjust your organizational system. Schedule a comprehensive review every six months to evaluate what is working and what needs modification. During these reviews, purge supplies that are expired, damaged, or no longer align with your current crafting interests. Take photographs of your craft area during these reviews to track your organizational progress and identify areas that might need additional attention. Remember that an effective organization system is not static but a dynamic process that grows and changes alongside your creative pursuits.
The ultimate measure of success is how seamlessly your organization system supports your creativity.
Use this checklist table to guide you through organizing and maintaining your craft area, covering key tasks mentioned throughout the article for an effective and sustainable system.
| Organization Task | Description | Frequency |
|---|---|---|
| Assess & Inventory Supplies | Take full stock of items, categories, and storage | Initially, then every 6 months |
| Sort by Category | Group supplies by type and usage | Initially, then as needed |
| Select Storage Solutions | Choose containers, shelving, and organizers | After sorting |
| Label Everything | Create clear, consistent labels for all storage | At setup, update as needed |
| Regular Clean-Up | Return items to their place after each craft session | After every use |
| Purge Unused/Expired Items | Remove damaged or unused materials | Every 6 months |
| Review & Adjust System | Assess what works and update organization | Every 6 months |
 When you can move smoothly between supplies, find exactly what you need without frustration, and return items to their homes effortlessly, you have achieved true craft space organization.
Transform Your Craft Chaos into Creative Calm
Tired of messy craft zones and supplies you can never find? An organized creative space starts with the right storage solutions. This article showed you how clutter can stifle inspiration and overwhelm even the most enthusiastic crafter. Imagine your craft materials sorted, visible, and easy to access in containers designed to suit every need—from tiny embellishments to rolls of fabric. Discover functional and stylish organization systems that make your craft area a joy to use every day. For even more targeted ideas, check out our wide range curated for Bedroom Storage, where versatile boxes, bins, and dividers can easily adapt to your creative pursuits.
Do not let frustration slow you down. See for yourself how the right storage, available today at BLUSHBEES USA, can turn your crafting chaos into a beautiful and efficient workspace. Browse now and take the first step toward a more organized and inspired crafting life. Your supplies—and your creativity—deserve it.
Frequently Asked Questions
How do I start organizing my craft supplies?
Begin by assessing your current supply situation. Clear a flat surface, sort your supplies into categories, and create separate piles for items to keep, donate, or discard. Document your inventory and measure your workspace for better organization.
What are some effective storage solutions for craft supplies?
Vertical storage solutions like shelving units, pegboards, and wall-mounted racks are great for maximizing space. Use clear, stackable containers for small items, and choose durable materials that can adapt as your crafting needs change.
How can I maintain my organized craft area?
Establish a routine to return items to their designated spaces after each use. Consider a quick cleanup checklist and schedule comprehensive reviews of your organization system every six months to assess what works and what needs improvement.
What labeling methods are best for organizing craft supplies?
Use high-quality, durable labels that can withstand frequent handling. Color-coded labels, digital label makers, and removable vinyl labels for transparent containers are effective. Establish a consistent labeling system that indicates categories, colors, or sizes to enhance organization.

