
Clutter piles up fast, and a messy storage system can leave you spending extra hours searching for what you need. Studies show that the average person wastes over 55 minutes each day looking for misplaced items. Choosing the right storage containers and label solutions is more than a matter of convenience—it helps protect your belongings, saves time, and reduces stress. With a few practical steps, you can turn chaos into order and enjoy a smoother, more organized daily routine.
Table of Contents
- Step 1: Assess Storage Needs And Container Types
- Step 2: Select Appropriate Labels For Each Container
- Step 3: Design And Create Attractive Custom Labels
- Step 4: Apply Labels For Clear Visibility And Durability
- Step 5: Check Label Placement And Adjust As Needed
- Step 6: Maintain And Update Labels For Lasting Order
Quick Summary
| Key Point | Explanation |
|---|---|
| 1. Assess Storage Needs First | Conduct an inventory to categorize items by type and storage requirements for efficient organization. |
| 2. Choose Durable, Appropriate Containers | Select containers that suit specific storage demands, ensuring material strength and suitability for contents. |
| 3. Design Clear, Informative Labels | Create labels that include key details like contents, category, and handling, ensuring they are easy to read. |
| 4. Maintain Label Visibility and Durability | Regularly check label conditions and replace or update them to ensure they remain legible and functional. |
| 5. Implement Periodic Maintenance | Schedule quarterly reviews for labels to keep your organization system effective and up-to-date. |
Step 1: Assess Storage Needs and Container Types
Effective storage begins with understanding your specific organizational requirements and selecting the right containers. This critical first step helps you create a systematic approach to labeling and storing items efficiently.
Start by conducting a comprehensive inventory of the items you need to organize. Walk through each room and categorize objects by type frequency of use and storage requirements. According to guidelines from the Department of Environment, selecting containers without holes or structural damage is crucial for maintaining item integrity. Consider factors like container material durability climate exposure and potential weight load.
Prioritize containers that match your specific needs. For kitchen items choose moisture resistant containers with tight seals. For documents select archival quality boxes. For clothing opt for breathable containers with protective features. Your goal is matching container characteristics with the unique demands of what you are storing. Pro tip create a quick spreadsheet tracking each storage area its contents and recommended container type to streamline your organization process.
Once you have identified your storage needs the next step is preparing to implement an effective labeling system that brings clarity and structure to your newly organized spaces. Understanding your containers sets the foundation for precise and practical labeling strategies.
Step 2: Select Appropriate Labels for Each Container
Selecting the right labels is crucial for maintaining an organized storage system that helps you quickly locate and manage your items. This step transforms your containers from generic storage spaces into clearly defined information centers.
As recommended by the Commission for Environmental Cooperation, your labels must be clear legible visible and durable. Start with high quality label materials that can withstand different environmental conditions. Consider waterproof or laminated labels for areas with moisture exposure like kitchens or garages. Choose label colors and sizes that match your containers and provide sufficient space for detailed information.
When designing your labels focus on clarity and specificity. Include key details such as contents category date of storage expiration if applicable and any special handling instructions. University of Windsor emphasizes the importance of including precise product names and safety information. For household storage this might mean noting specific food types storage dates or special care requirements. Pro tip use a consistent label template across all your containers to create a uniform organizational system that looks professional and makes information easy to read.
With your labels prepared you are now ready to implement your comprehensive storage and labeling strategy bringing order and efficiency to your living spaces.
Step 3: Design and Create Attractive Custom Labels
Creating custom labels transforms basic storage containers into personalized organizational systems that reflect your unique style and practical needs. This step allows you to design labels that are both functional and visually appealing.
According to Organized Life Design, you have multiple labeling options to explore. Consider hand lettered labels for a personal touch or vinyl labels for a crisp clean look on plastic containers. If you have children in the home try adding pictures to labels in playrooms or shared spaces to help younger family members identify contents easily.
Get creative with your label design approach. AA Labels suggests exploring custom sized labels that perfectly fit your unique containers or incorporating illustrated decorative elements that make organization feel more enjoyable. Digital enthusiasts might even experiment with QR code labels that can store additional information or link to detailed inventory lists. Pro tip invest in quality label printing materials or waterproof label sheets to ensure your custom designs remain legible and attractive over time.
With your personalized labels complete you are now ready to transform your storage system into a streamlined organized space that looks great and functions perfectly.
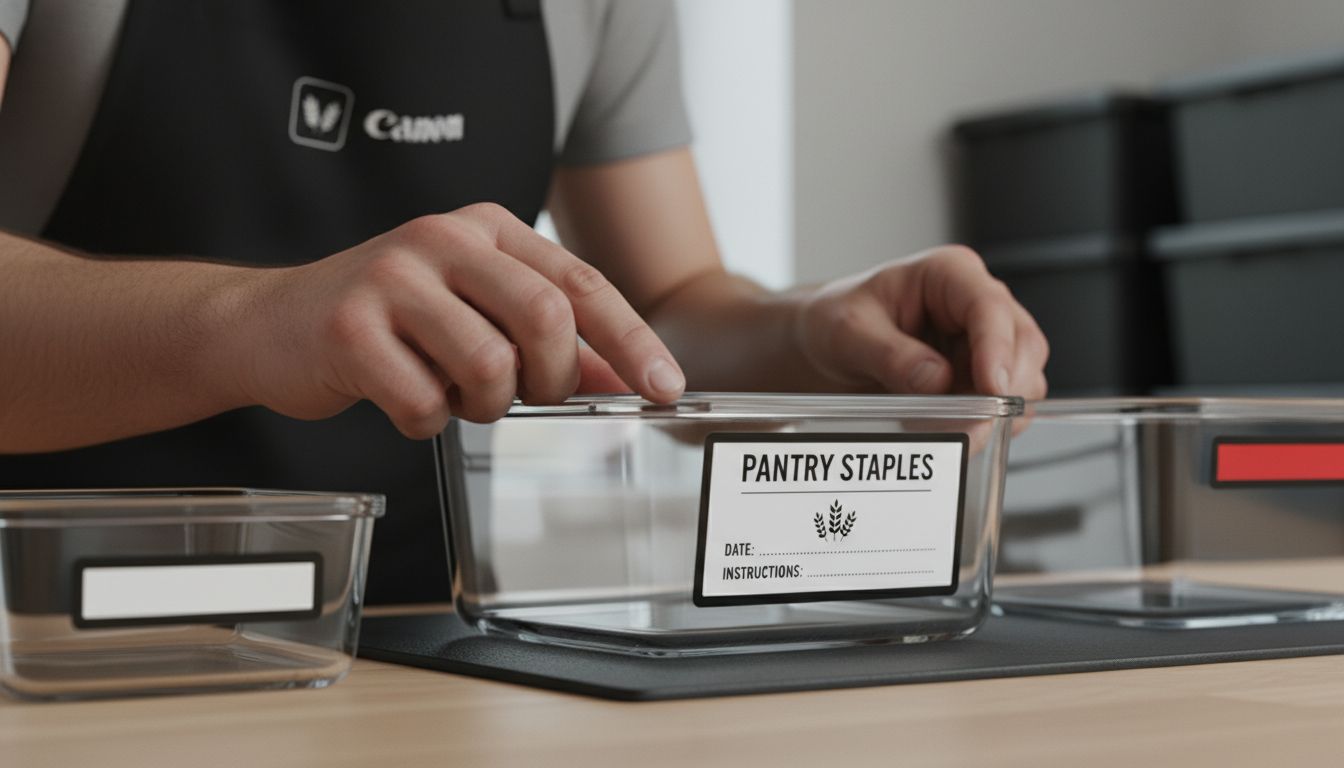
Step 4: Apply Labels for Clear Visibility and Durability
Applying labels effectively is the final step in creating a professional and functional storage organization system. This process ensures your carefully designed labels serve their ultimate purpose of clear identification and easy navigation.
According to the Commission for Environmental Cooperation, labels must be clearly legible and visible to facilitate quick identification. Begin by cleaning the container surface thoroughly to ensure proper label adhesion. Choose a smooth flat area of the container that is not exposed to frequent handling or friction. When positioning labels aim for consistent placement across similar containers creating a uniform look that makes scanning and reading easy.
The Malaysian Department of Environment recommends placing labels on a background of contrasting color to enhance visibility. For best results select label colors that stand out against your container surface. Ensure labels are firmly pressed down with no air bubbles or loose edges that could compromise durability. Pro tip use clear adhesive laminate over your labels for extra protection especially for containers stored in areas with moisture humidity or frequent handling.
With your labels now expertly applied you have transformed your storage system into an organized efficient and visually appealing solution that makes finding and managing items a breeze.
Step 5: Check Label Placement and Adjust as Needed
Finalizing your storage organization system requires careful review and occasional adjustments to ensure your labels remain effective and functional. This step helps you maintain the clarity and precision of your labeling strategy.
Commission for Environmental Cooperation emphasizes the critical importance of maintaining label legibility and visibility. Begin by systematically reviewing each labeled container from different angles and lighting conditions. Check that labels are straight aligned and fully adhered without bubbles or wrinkles. Pay special attention to containers in high traffic areas or those subject to frequent handling where labels might experience more wear and tear.
Following recommendations from the Malaysian Department of Environment, assess your labels ability to withstand environmental conditions. Look for signs of fading peeling or damage especially for containers stored in areas with temperature fluctuations moisture or direct sunlight. Pro tip create a label maintenance schedule where you review and replace labels every six months or immediately if you notice significant degradation. This proactive approach ensures your storage system remains organized efficient and easy to navigate.

With your labels now carefully reviewed and adjusted you have completed the final step in creating a professional and sustainable storage organization system.
Step 6: Maintain and Update Labels for Lasting Order
Maintaining an organized storage system requires ongoing attention and periodic updates to your labeling strategy. This final step ensures your carefully crafted organizational system remains functional and effective over time.
According to University of Maryland guidelines containers must be kept in good condition without damage or degradation. Implement a quarterly review process where you systematically check each labeled container for signs of wear fading or information obsolescence. Update labels that have become difficult to read or no longer accurately represent the containers contents. Consider creating a digital backup of your labeling system to track changes and maintain consistency across your storage spaces.
Following recommendations from the University of Windsor, ensure all containers remain clearly labeled with current and accurate information. Pro tip develop a simple tracking system perhaps a spreadsheet or digital note that helps you monitor when labels were created last updated and when they might need replacement. This proactive approach prevents confusion and maintains the efficiency of your storage organization system keeping everything easily identifiable and neatly arranged.
With these maintenance strategies in place you have now mastered the art of creating a comprehensive and sustainable storage labeling system that will serve you well into the future.
Transform Your Storage with Clear Labeling and Stylish Solutions
Struggling to keep your home organized can feel overwhelming, especially when storage containers blend into the background without clear labels. This article highlights the importance of choosing the right labels for your containers and applying them for easy identification. It also focuses on durable, legible labels that stand up to moisture and frequent use. To address this, pairing quality labeling strategies with functional storage products is key to achieving lasting order and peace of mind.
Make organizing even easier by selecting storage options designed to complement your labeling system. Check out the Bedroom Storage solutions that combine practical design with elegant style. For all your bathroom organization needs, explore the Bathroom Storage collection that offers moisture-resistant containers perfect for labeled setups. Keep an eye on the Deal Of The Week to take advantage of limited-time offers and save on must-have storage essentials.
Ready to bring clarity and beauty to your storage system? Visit https://blushbees.us now to find the perfect containers that work flawlessly with your labeling plan. Organize smarter and enjoy every space of your home today.
Frequently Asked Questions
How can I determine the best label type for my storage containers?
To find the best label type, consider the environment where your containers will be stored. Choose waterproof or laminated labels for areas with moisture and ensure that the labels are durable enough to withstand handling and time.
What information should I include on my storage labels?
Include key details such as the contents of the container, the category of items, the date of storage, and any specific handling instructions. This will enhance identification and ensure proper usage of the items within the containers.
How do I ensure my labels remain legible and effective over time?
Regularly check your labels for any signs of fading, peeling, or damage, particularly in high-traffic areas. Conduct a review every six months to replace any labels that show wear or no longer accurately represent the contents.
What is the best way to apply labels for maximum visibility?
Position labels on a smooth, flat area of the container that experiences minimal handling. Use contrasting colors for the labels and the container surface to improve visibility, ensuring they are firmly pressed down without air bubbles.
Can I create custom labels for my storage containers?
Yes, you can create custom labels that reflect your personal style or specific needs. Get creative with sizing and design, perhaps incorporating images or QR codes, to make the labels functional and visually appealing.
How should I maintain my labeling system for ongoing organization?
Implement a quarterly review process to check each labeled container for clarity and accuracy. Update labels as needed and consider keeping a digital log of your labels, tracking when they were last updated or replaced.
Recommended
- Maximize Space and Declutter with Collapsible Storage Boxes: The Ultim – BLUSHBEES USA
- Shelf Organization Ideas for Stylish and Smart Storage 2025 – BLUSHBEES USA
- 7 Creative Ways to Repurpose Containers for Your Home – BLUSHBEES USA
- 10 Home Organization Tips for a More Tidy and Efficient Living Space – BLUSHBEES USA

