
A cluttered kitchen countertop can make even the simplest meal feel like an impossible challenge and most of us do not realize just how much space is wasted by everyday items. When people clear their counters and inventory everything, over half of what sits there is rarely used or totally unnecessary. That sounds wild, but leaving things out is usually a habit, not a necessity. The real secret is you do not need more space at all you just need a smarter setup tailored to how you actually cook.
Table of Contents
- Step 1: Assess Your Current Countertop Layout
- Step 2: Declutter And Sort Your Countertop Items
- Step 3: Categorize Items For Efficient Storage Solutions
- Step 4: Choose Stylish Storage Solutions That Fit Your Style
- Step 5: Implement Your New Organization System
- Step 6: Maintain Your Organized Countertop For Longevity
Quick Summary
| Key Point | Explanation |
|---|---|
| 1. Assess your current layout critically | Clear your countertop and inventory all items to identify clutter and improve space organization. |
| 2. Sort items into three categories | Divide items into keep, relocate, and discard zones to streamline usage and reduce clutter. |
| 3. Create logical item categories | Establish clear categories that reflect your cooking habits to improve efficiency in the kitchen workflow. |
| 4. Choose stylish and functional storage solutions | Select storage options that complement your kitchen style while enhancing organization and functionality. |
| 5. Implement and maintain your system | Gradually introduce your organization system and create daily routines to ensure long-term upkeep and efficiency. |
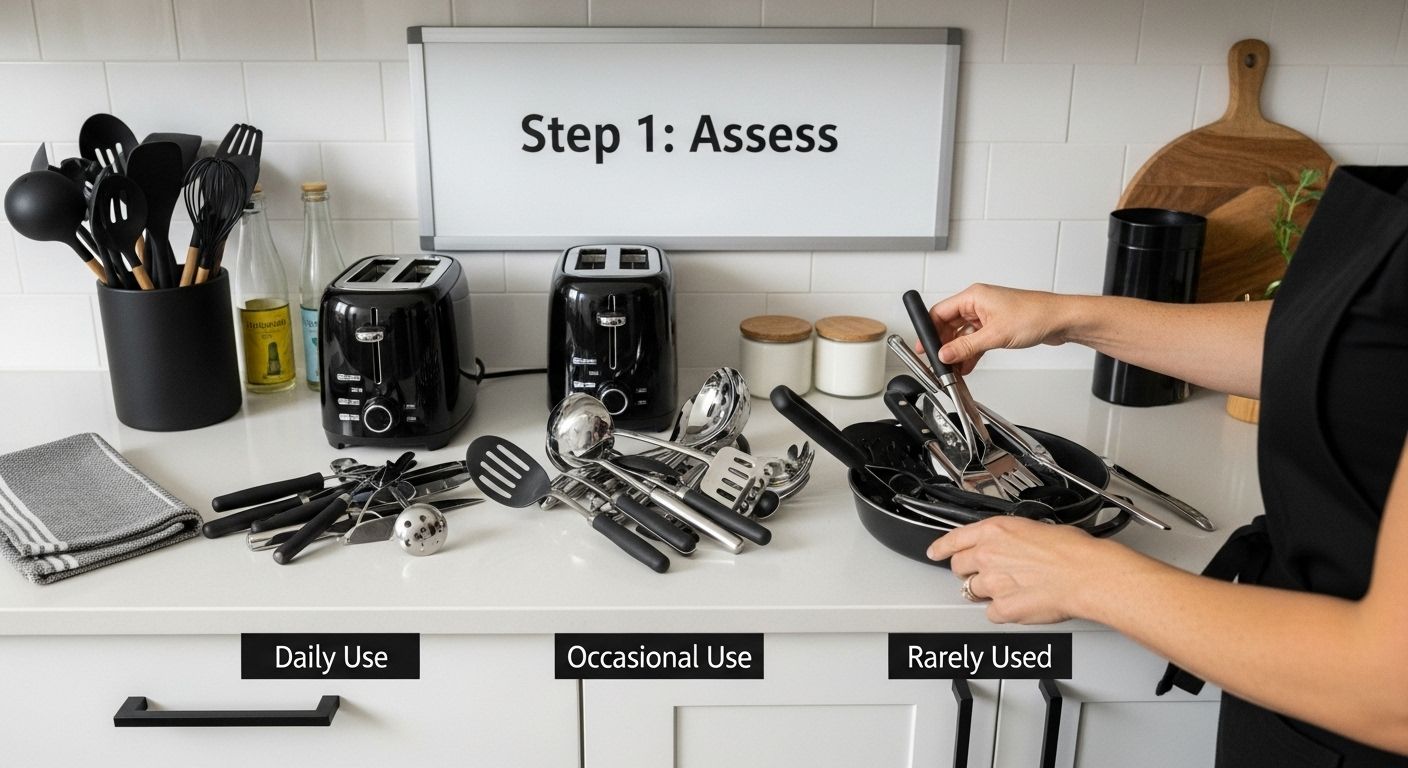
Step 1: Assess Your Current Countertop Layout
Transforming your kitchen countertop from chaotic to organized begins with a strategic assessment of your current layout. Understanding how you currently use your countertop space is the foundational step in creating a more efficient and visually appealing kitchen environment. Before diving into organization strategies, you need to critically examine your existing setup and identify areas of improvement.
Start by completely clearing your countertop surfaces and taking a comprehensive inventory of everything currently occupying this valuable space. This means removing every item small appliance, utensil container, salt and pepper shakers, and miscellaneous objects. Spread these items out on a large table or clean floor space where you can see everything clearly. This visual audit will help you recognize patterns of clutter and understand which items genuinely need countertop real estate.
As you review your items, categorize them into three distinct groups: frequently used items, occasionally used items, and rarely used items. Frequently used items might include your coffee maker, knife block, or cooking utensils that you reach for daily. Occasionally used items could be specialty small appliances like a stand mixer or blender. Rarely used items are those that can be stored in cabinets or pantry spaces. Learn more about smart kitchen storage solutions that can help you make these critical decisions.
The goal of this assessment is not just to declutter but to create a functional workflow that makes cooking and daily kitchen tasks more streamlined. Consider how you move around your kitchen while preparing meals. Which items do you consistently reach for? Where do bottlenecks occur in your current setup? By understanding your unique cooking patterns, you can design a countertop organization system that supports your lifestyle rather than hindering it.
Once you’ve completed your inventory and categorization, you’ll have a clear blueprint for the next steps in kitchen countertop organization.
To help you quickly reference the main process, here is an overview of each kitchen countertop organization step, with typical effort levels and the key outcome for each.
| Step | Description | Difficulty Level | Key Outcome |
|---|---|---|---|
| 1. Assess Current Layout | Clear counters and inventory all items to identify usage patterns and clutter | Easy | Clear understanding of what currently occupies countertop space |
| 2. Declutter and Sort | Sort items into keep, relocate, and discard zones based on frequency of use | Moderate | Countertop contains only necessary, frequently used items |
| 3. Categorize Items | Organize items into logical groups (e.g., cooking tools, beverage prep, essentials) | Easy | Establishes efficient, easy-to-find storage categories |
| 4. Choose Storage Solutions | Select storage that matches your needs and personal style | Moderate | Stylish, functional organization tools enhance appearance and accessibility |
| 5. Implement System | Gradually put the new organization into daily practice and adjust as needed | Moderate | System set up for real-life usage and easy access |
| 6. Maintain Organization | Create routine to keep things tidy and adapt over time | Easy | Sustainable kitchen organization with ongoing efficiency |

Step 2: Declutter and Sort Your Countertop Items
Decluttering and sorting your countertop items is a transformative process that will dramatically improve your kitchen’s functionality and visual appeal. After assessing your current layout, you are now ready to make strategic decisions about what truly belongs on your countertop and what should be relocated. This step requires a disciplined approach and willingness to be ruthlessly practical about your kitchen storage needs.
Begin by creating three distinct sorting zones: keep, relocate, and discard. The keep zone is reserved for items you use multiple times per week and require immediate accessibility. These might include your primary coffee maker, a knife block, or frequently used cooking utensils. The relocate zone will house items that are valuable but do not need constant countertop presence. Explore smart storage solutions for kitchen items to help you effectively manage these items. The discard zone is for broken tools, expired products, and items that no longer serve a practical purpose in your kitchen.
As you sort, be honest with yourself about item usage. A stand mixer that you use twice a year does not merit prime countertop real estate. Consider alternative storage solutions like cabinet shelves or pantry spaces for less frequently used appliances. Pay special attention to items that accumulate without purpose paperwork, random kitchen gadgets, or decorative items that collect dust. Your countertop is valuable workspace, not a storage catchall.
To make this process more manageable, tackle one section of your countertop at a time. This prevents overwhelm and allows you to make thoughtful decisions about each item. Remember that effective kitchen organization is not about having the least number of items, but about having the right items in the most functional locations. By the end of this sorting process, your countertop should feel spacious, intentional, and designed to support your daily cooking and food preparation routines.
Step 3: Categorize Items for Efficient Storage Solutions
Categorizing kitchen items is the strategic bridge between decluttering and creating a functional storage system. This critical step transforms your countertop from a random collection of objects into a purposeful workspace designed around your specific cooking and daily kitchen needs. By thoughtfully organizing your items, you will maximize efficiency and create a more intuitive kitchen environment.
Begin by establishing clear categories that reflect your actual kitchen workflow. Primary categories might include cooking tools, beverage preparation, food prep stations, and daily essentials. Within these broad categories, create subcategories that make sense for your specific lifestyle. For instance, your cooking tools category could include frequently used utensils, cutting boards, and essential seasonings. Discover innovative storage strategies for maximizing kitchen space to help refine your categorization approach.
Consider implementing vertical and horizontal storage solutions that complement your categorization strategy. Invest in drawer dividers, stackable containers, and compact risers that help maintain clear boundaries between different item groups. A tiered spice rack, for example, can transform a cluttered collection of seasonings into an organized display that makes cooking more enjoyable. Pay special attention to items that tend to create visual chaos like charging cables, random papers, or miscellaneous kitchen gadgets. These should be either completely removed from the countertop or contained within designated organizational tools.
The ultimate goal of categorization is creating a system so intuitive that maintaining organization becomes second nature.
Here is a quick-reference guide to common kitchen countertop item categories, showing what belongs in each group and where these items are best stored for efficiency.
| Category | Typical Items | Recommended Storage Location |
|---|---|---|
| Cooking Tools | Knife block, spatula, tongs | Countertop (within reach) |
| Beverage Prep | Coffee maker, kettle, mugs | Countertop (daily use area) |
| Food Prep | Cutting board, mixing bowls | Easily accessible cabinet or nearby storage |
| Daily Essentials | Oil, salt, pepper, frequently used utensils | Countertop in dedicated zone |
| Occasional Appliances | Stand mixer, blender, toaster oven | Cabinet or pantry (off countertop) |
| Miscellaneous/Decor | Mail, papers, decorative items | Relocate or remove from countertop |
| Rarely Used Items | Specialty gadgets, extra cookware | Pantry, deep cabinets, or storage |
| Each category should have a logical home that makes sense with your cooking habits and kitchen layout. By the end of this process, your countertop will not just look cleaner it will function as a dynamic, efficient workspace that supports your culinary creativity and daily kitchen routines. |
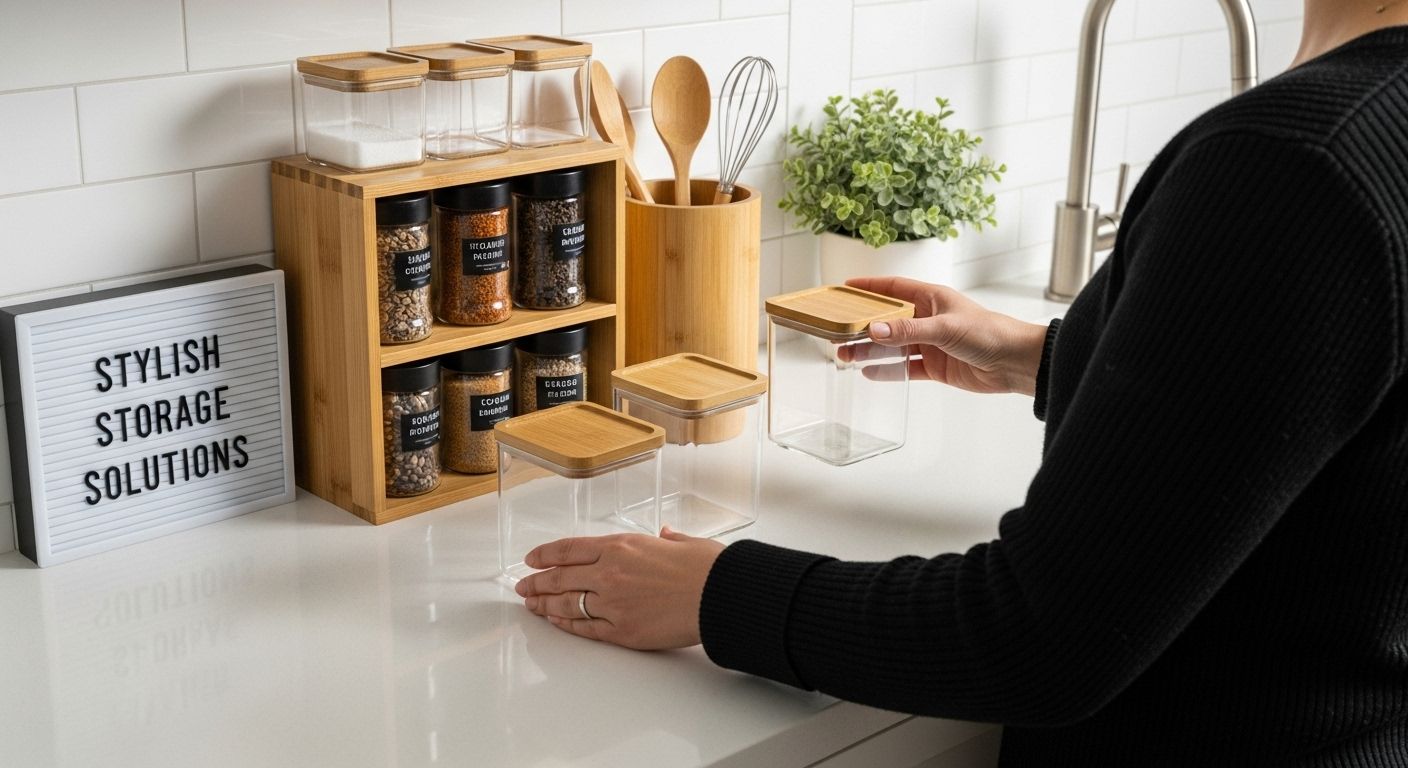
Step 4: Choose Stylish Storage Solutions That Fit Your Style
Selecting storage solutions that complement both your functional needs and personal aesthetic transforms kitchen organization from a mundane task into an opportunity for creative expression. Your storage choices should not only solve practical challenges but also reflect your unique style and enhance the overall visual harmony of your kitchen space. The key is finding solutions that are as beautiful as they are functional.
Start by considering materials and finishes that align with your existing kitchen decor. If your kitchen features warm wood tones, opt for storage containers and organizers in natural wood or bamboo. For modern, minimalist spaces, sleek ceramic, glass, or matte metal solutions work beautifully. Explore compact storage solutions that maximize style and efficiency to inspire your selection process. Consider investing in matching sets of storage containers that create a cohesive look while providing practical organization for ingredients, utensils, and kitchen tools.
Pay attention to the details that elevate storage from merely functional to genuinely stylish. Look for organizers with clean lines, interesting textures, or subtle design elements that catch the eye. Transparent glass containers with bamboo lids, marble utensil holders, or copper wire baskets can serve as both storage solutions and decorative accents. Remember that open storage solutions require a commitment to maintaining a tidy appearance. Choose containers with tight-fitting lids, stackable designs, and easy-to-clean surfaces that will keep your countertop looking pristine. By carefully selecting storage solutions that blend practicality with personal style, you transform your kitchen organization from a chore into an opportunity for creative design that makes cooking more enjoyable and visually inspiring.
Step 5: Implement Your New Organization System
Implementing your new kitchen countertop organization system requires patience, commitment, and a strategic approach that transforms your carefully planned vision into reality. This crucial step bridges the gap between your organizational design and daily practice, turning theoretical organization into functional living. The success of your system depends not just on initial setup, but on consistent maintenance and adaptation.
Start by introducing your new storage solutions and organizational categories gradually. Resist the temptation to overhaul everything simultaneously, which can feel overwhelming and lead to quick abandonment. Instead, implement your system in stages, allowing yourself time to adjust and refine each component. Discover practical strategies for maintaining organized spaces to support your implementation process. Begin with one category or section of your countertop, carefully placing items in their designated locations and observing how the new system feels during actual use.
Create a simple accountability mechanism to ensure your new organization system becomes a sustainable habit. This might involve a weekly 10-minute reset where you return items to their assigned locations, reassess your categorization, and make minor adjustments. Pay close attention to friction points where your system might feel unnatural or challenging. Are certain items consistently ending up in the wrong place? Do you find yourself struggling to access frequently used tools? These observations are valuable feedback that will help you continuously refine your organizational approach. The goal is not perfection, but a system that genuinely supports your cooking and kitchen workflow. By approaching implementation as an iterative process of learning and adjustment, you transform kitchen organization from a static task into a dynamic, personalized solution that evolves with your lifestyle.
Step 6: Maintain Your Organized Countertop for Longevity
Maintaining your newly organized kitchen countertop is the final and most critical step in ensuring your hard work translates into lasting change. Consistency is the cornerstone of successful organization, transforming your carefully designed system from a temporary solution into a sustainable lifestyle practice. Your goal is to create habits that make maintaining order feel effortless and natural, rather than a constant struggle.
Develop a daily five-minute reset routine that becomes as automatic as brewing your morning coffee. At the end of each cooking session or before bed, take a few moments to return items to their designated spaces, wipe down surfaces, and quickly assess your organizational system. Explore additional tips for maintaining an organized home to support your ongoing efforts. This brief daily practice prevents clutter from accumulating and helps you identify any areas where your current system might need adjustment. Consider creating a small checklist or setting a phone reminder to support this new habit until it becomes second nature.
Remember that your organizational system is a living strategy that will evolve with your changing needs. Be kind to yourself during this process and view minor setbacks as opportunities for refinement rather than failures. Periodically reassess your categories, storage solutions, and workflow every few months. Are there new cooking tools you’ve acquired? Have your cooking habits changed? Flexibility is key to maintaining a system that continues to serve you effectively. By approaching kitchen countertop organization as an ongoing practice of mindfulness and adaptation, you transform a once-chaotic space into a consistently functional and enjoyable cooking environment.
Elevate Your Kitchen Countertop Organization With Solutions That Last
Struggling to keep your kitchen countertop clear and functional despite your best efforts? If decluttering feels overwhelming and you want a smart, stylish way to store your most-used tools, you are not alone. Many readers feel challenged by cluttered surfaces, lack of logical categories, and the hunt for practical storage that actually looks good. You have learned how categorization and intentional storage choices can make a world of difference. Now, take the next step and transform your routine with real, lasting storage solutions built for everyday living. For those serious about a tidier home, explore our exclusive Kitchen Storage Collection designed to blend elegance with efficiency and match the style tricks from this very article. You will find containers, baskets, and dividers sized perfectly to keep everything accessible and beautiful.

Ready to stop the cycle of countertop chaos? Shop BLUSHBEES USA for organization essentials that make your kitchen proud. Take advantage of current product bundles and home organization offers before they expire. Modernize your kitchen experience and enjoy the confidence that comes with a serene, clutter-free kitchen every single day.
Frequently Asked Questions
How can I assess my current kitchen countertop layout?
To assess your kitchen countertop layout, begin by removing all items from your countertop and taking inventory of what you have. Sort these items into three groups: frequently used, occasionally used, and rarely used. This will help you identify areas for improvement and create a more functional workspace.
What should I consider when decluttering my countertop?
When decluttering your countertop, create sorting zones labeled ‘keep,’ ‘relocate,’ and ‘discard.’ Items in the keep zone should be used multiple times a week, while those in the relocate zone are valuable but not needed daily. Discard items that are broken, expired, or no longer useful in your kitchen.
How do I categorize items for better storage solutions?
To categorize items effectively, establish clear categories based on your cooking workflow, such as cooking tools, beverage preparation, and daily essentials. Creating subcategories helps maintain organization, making it easier to access items when needed.
What storage solutions can enhance both functionality and style in my kitchen?
When selecting storage solutions, choose materials and designs that match your kitchen decor. Look for stylish yet functional items like clear containers, tiered spice racks, and decorative baskets. Balancing aesthetics with practicality ensures your counter remains organized and visually appealing.

