
Clutter can turn even the coziest home into a source of stress. Most people think tackling a messy house will take hours or even days, which sounds exhausting. But research shows that most effective decluttering sessions are just 15 to 30 minutes long and those small bursts can completely change the energy of your space.
Table of Contents
- Step 1: Gather Your Decluttering Supplies
- Step 2: Set a Timer and Choose a Target Area
- Step 3: Sort Items Into Keep, Donate, or Discard
- Step 4: Organize Remaining Items Efficiently
- Step 5: Establish a Maintenance Plan
Quick Summary
| Key Point | Explanation |
|---|---|
| 1. Gather essential decluttering supplies | Prepare sturdy bags, bins, and labels to streamline your decluttering process and reduce interruptions. |
| 2. Use a timer for focused sessions | Limit decluttering to 15-30 minutes to boost efficiency and maintain motivation, starting with small areas. |
| 3. Sort items into clear categories | Establish designated areas for ‘Keep,’ ‘Donate,’ ‘Sell,’ and ‘Trash’ to make decisive choices about your belongings. |
| 4. Organize remaining items with purpose | Create intuitive storage systems based on frequency of use to keep spaces functional and manageable. |
| 5. Implement a consistent maintenance plan | Establish daily and weekly routines to sustain organization and prevent clutter from returning over time. |
Step 1: Gather Your Decluttering Supplies
Successful decluttering starts with strategic preparation. Before diving into the chaos of clearing out spaces, you need a well-organized approach and the right tools to make your project efficient and smooth. Where to Start When Your Whole House is a Mess suggests having a comprehensive strategy before beginning.
To transform your home quickly, you will need a specific set of supplies that will streamline your decluttering process. According to Mississippi State University Extension, having the right equipment can make a significant difference in your organizational efforts.
Your essential decluttering kit should include:
- Sturdy garbage bags for immediate disposal
- Large storage bins with lids for sorting items
- Heavy duty markers for labeling containers
- Multipurpose cleaning supplies
- Microfiber towels for quick surface cleaning
- A vacuum cleaner for immediate area cleanup
Start by gathering these supplies in a central location where you can easily access them. Pro tip: Choose clear plastic bins with secure lids to help you see contents and keep items protected during sorting. This preparation phase might seem tedious, but it dramatically reduces interruptions during your actual decluttering session.
Mental preparation is equally important as physical supplies. Approach your decluttering with a decisive mindset. Set a clear intention to be ruthless about what stays and what goes. Remember that every item you remove is a step toward a more organized, peaceful living space. Create designated areas for sorting: keep, donate, sell, and trash. This method helps you make quick decisions and prevents items from becoming visual noise in your home.
Once your supplies are assembled and your mindset is focused, you are ready to begin the transformative process of decluttering. Your preparation will ensure a smooth, efficient journey toward a more organized home.
Here is a summary table of essential decluttering supplies, their purposes, and extra notes to streamline your preparation.
| Supply | Purpose | Notes |
|---|---|---|
| Garbage bags | Immediate disposal | Use sturdy bags for heavy items |
| Storage bins with lids | Sorting and storing items | Clear plastic helps identify contents |
| Heavy duty markers | Labeling containers | Use large, legible writing |
| Cleaning supplies | Quick surface cleaning | Multipurpose products for all areas |
| Microfiber towels | Dusting and wiping surfaces | Reusable and effective for all rooms |
| Vacuum cleaner | Area cleanup after decluttering | Ensure easily accessible |
Step 2: Set a Timer and Choose a Target Area
Time management is the secret weapon in transforming your home from cluttered to clean. Our home organization guide recommends strategic time blocking to maximize efficiency. According to Oklahoma State University Extension, using a timer creates structure and prevents overwhelm during decluttering sessions.
The key is selecting a focused time frame that matches your energy and available schedule. Most successful decluttering sessions range between 15 to 30 minutes. This duration is long enough to make meaningful progress but short enough to maintain motivation and prevent mental exhaustion.
When choosing your target area, think strategically. Start with a space that will provide quick, visible results and boost your confidence. Small spaces like a bathroom drawer, kitchen counter, or bedside table are excellent initial targets. These compact areas allow you to experience immediate success and create momentum for larger projects.
Before starting your timer, take a moment to visualize your desired outcome. What does an organized version of this space look like? Imagine the calm and efficiency you will feel once the area is streamlined. This mental preparation helps you stay focused and motivated during your decluttering session.
As you begin, remember these critical guidelines:
- Set a clear, realistic timer for 15-30 minutes
- Choose a small, manageable space to start
- Keep your sorting bins and garbage bags nearby
- Work systematically, moving from one section to another
Pro tip: Turn your decluttering session into a small challenge or game. Challenge yourself to fill one garbage bag or donate box within your chosen time frame. This approach transforms a potentially tedious task into an engaging activity.
If you find yourself losing focus or feeling overwhelmed, pause the timer. Take a deep breath and reset your intention. Sometimes stepping back for a moment can help you approach the task with renewed energy and clarity.
Once your timer goes off, celebrate your progress. Even if you haven’t completely finished the area, you have taken significant steps toward a more organized home. Remember: consistent small efforts create substantial transformation.
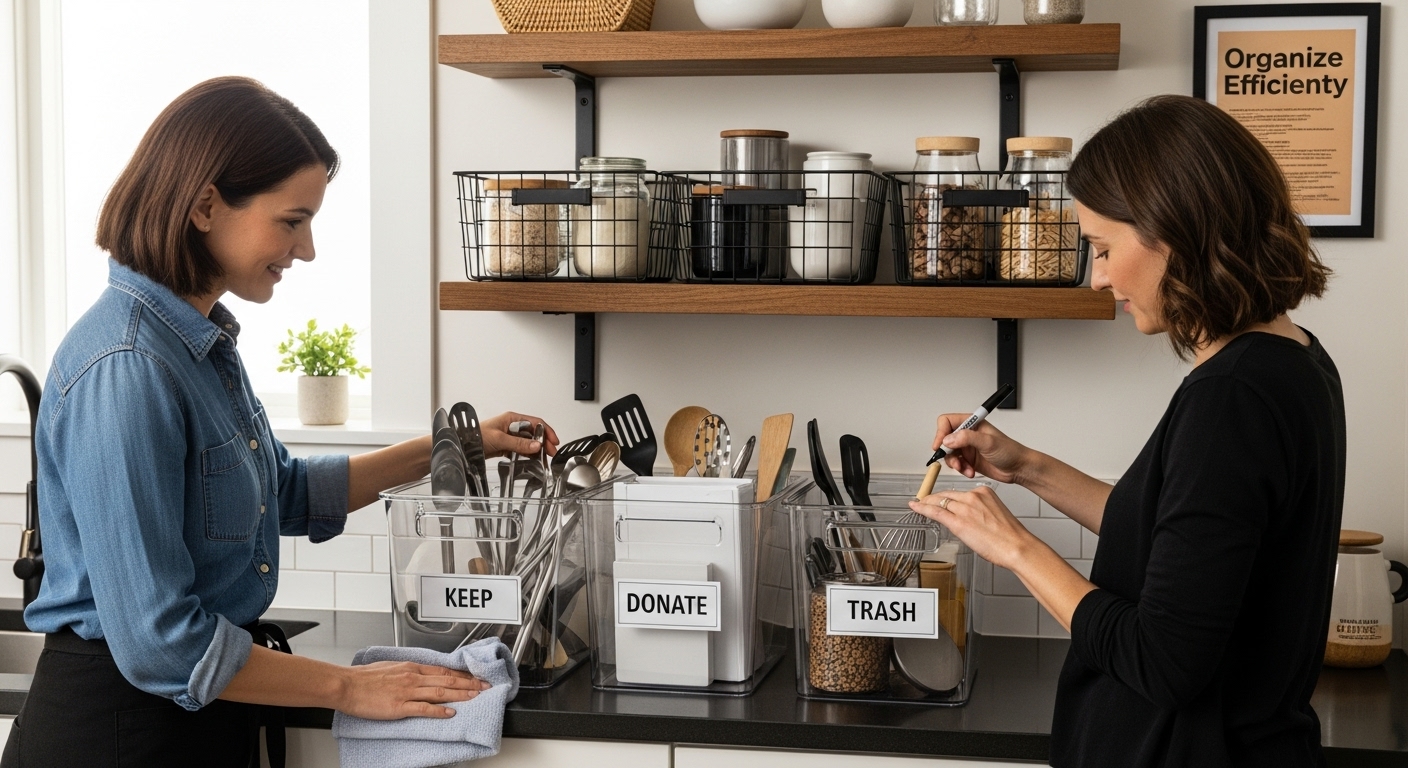
Step 3: Sort Items into Keep, Donate, or Discard
The sorting phase is where real decluttering magic happens. Top Closet Cleanout Tips for Busy Homes emphasizes the importance of making decisive choices during this critical stage. According to Mississippi State University Extension, creating clear sorting categories is essential for effective decluttering.
The golden rule of sorting is to be ruthlessly honest with yourself. Look at each item and ask: Have I used this in the past year? Does it bring genuine value to my life? Would I buy this again today? These questions help cut through emotional attachment and sentimental clutter.
Prepare four distinct containers or designated areas for your sorting process:
- Keep: Items that are actively used and truly necessary
- Donate: Good condition items that can help others
- Sell: Valuable items with potential resale value
- Trash: Broken, worn out, or unusable items
Start with smaller, less emotionally charged items to build momentum. Kitchen utensils, office supplies, or bathroom products are excellent starting points. As you sort, place items swiftly into their designated containers. Hesitation is the enemy of effective decluttering. Trust your first instinct and keep moving.
For sentimental items, create a separate small box with strict limitations. Allow yourself to keep only a few meaningful mementos that truly represent your memories. Take photos of items with emotional significance but limited practical use. This digital preservation helps you let go while keeping the memory alive.
When deciding what to donate, consider the condition and potential usefulness to others. Clothing should be clean and without significant wear. Kitchen items, books, and home decor can find new life through donation centers or local charities. Remember: one person’s clutter is another’s treasure.
For items with potential monetary value, research quick selling platforms like online marketplaces or local consignment shops. Set a realistic timeline for selling. If an item doesn’t sell within a month, consider donating to prevent it from becoming additional clutter.
Once sorting is complete, immediately remove trash and donation bags from your space. This immediate action prevents second-guessing and maintains the momentum of your decluttering process. Celebrate your progress and the newfound clarity in your living environment.
![]()
Step 4: Organize Remaining Items Efficiently
Organization transforms decluttered spaces from merely clean to genuinely functional. Bathroom Counter Organization Ideas highlights the importance of strategic placement and smart storage solutions. According to Goodwill Industries of the Chesapeake, effective organization requires a systematic approach.
The secret to efficient organization is creating intuitive, accessible storage systems. Think about how you naturally move and use items in each space. Place frequently used objects within easy reach and store less common items slightly out of the way. This approach ensures that your newly decluttered space remains practical and user-friendly.
Start by grouping similar items together. Kitchen utensils should live near cooking areas, office supplies should cluster around your workspace, and bathroom essentials should be within arm’s reach of where you typically use them. Vertical storage is your best friend in maximizing space. Invest in stackable containers, over-the-door organizers, and wall-mounted shelves to create additional storage without cluttering floor space.
Consider these strategic organization principles:
- Group items by frequency of use
- Use clear containers for easy visibility
- Label everything meticulously
- Create designated homes for each category of items
- Utilize vertical and hidden storage spaces
Labeling is more than just a organizational trick it is a maintenance strategy. Clear, legible labels help everyone in the household understand where things belong. Use a consistent labeling system with clear, large fonts. For shared spaces, consider color-coding to make identification even easier.
When selecting storage solutions, prioritize functionality over aesthetics initially. Transparent plastic bins, drawer dividers, and modular storage systems allow you to see and access items quickly. As you become more comfortable with your new organization system, you can gradually introduce more visually appealing storage options that match your personal style.
Remember that organization is an ongoing process. Set a monthly maintenance check to ensure your newly organized spaces remain clutter-free. Take 15 minutes each month to reassess your storage systems, return misplaced items to their designated spots, and make small adjustments as your needs change.
The ultimate test of your organization is simplicity. If finding and returning items feels natural and effortless, you have successfully created an efficient storage system.
 Celebrate this achievement your home is now a more peaceful, functional space.
Step 5: Establish a Maintenance Plan
A maintenance plan transforms your hard-earned decluttering efforts from a one-time event into a sustainable lifestyle. Home Organization Tips for Busy Homes emphasizes the importance of consistent upkeep. According to Utah State University Extension, regular maintenance prevents clutter from reaccumulating.
The key to long-term organization is creating a system that feels effortless and natural. Think of your maintenance plan as a personal commitment to your living space. This isn’t about perfection it is about creating sustainable habits that keep your home functional and peaceful.
Start by establishing a daily and weekly routine that takes minimal time but makes a significant impact. Implement a five-minute daily reset where every family member returns items to their designated spaces. This simple practice prevents clutter from building up and maintains the organizational system you have worked hard to create.
Your maintenance strategy should include these critical components:
- Daily 5-minute reset
- Weekly 30-minute deep clean
- Monthly organizational check
- Quarterly donation and reassessment
- Annual comprehensive review
Consistency is more important than perfection. If you miss a day or a week, do not get discouraged. Simply restart your routine without guilt. The goal is progress, not an impossible standard of constant organization.
Create visual reminders to support your maintenance plan. Use a wall calendar, smartphone reminders, or a dedicated organizational app to track your cleaning and organization schedule. Place these reminders in prominent locations where you will see them daily. Some people find success with color-coded cleaning schedules or reward systems that make maintenance feel more like a game than a chore.
Consider implementing a one-in-one-out rule for future purchases. Every time you bring a new item into your home, commit to removing a similar item. This prevents unnecessary accumulation and keeps your newly organized spaces clutter-free. Be mindful of impulse purchases and ask yourself if an item truly adds value to your life.
Finally, involve your entire household in the maintenance plan. Make it a collaborative effort by assigning age-appropriate tasks to children or creating a shared responsibility system with your partner. When everyone understands and participates in maintaining organization, the system becomes more sustainable and less burdensome.
Remember, a maintenance plan is a living document. Be flexible and willing to adjust your approach as your life and needs change. Your organizational system should serve you, not constrain you.
This overview table outlines each main step of the fast decluttering process, including estimated time and the core outcome of each phase.
| Step | Estimated Time | Key Outcome |
|---|---|---|
| Gather your decluttering supplies | 5-10 minutes | Preparation with all needed materials |
| Set a timer and choose a target area | 2-5 minutes | Focused, manageable area chosen |
| Sort items into keep, donate, or discard | 15-30 minutes | Clear categories for each item |
| Organize remaining items efficiently | 10-20 minutes | Functional, accessible storage systems |
| Establish a maintenance plan | 5-10 minutes | Ongoing habits to sustain organization |
Cut the Clutter for Good with Tailored Storage Solutions
Struggling to keep up with fast decluttering only to watch clutter creep back into your bedroom and closets? It is no secret that maintaining order across your home can feel exhausting when you lack the right tools. Your article highlighted the power of a solid plan, quick wins in small spaces, and a clear strategy to keep things organized long term. What if you could lock in that clean feeling and turn quick decluttering into a daily reality?
Discover how our expertly designed Bedroom Storage and Closet Storage solutions make it effortless to keep sorted items where they belong. Built for busy homes, our stylish bins, underbed containers, and dividers bring lasting order and visual calm to every corner.
Ready to stop clutter for good? Explore our complete selection at https://blushbees.us and transform your routines with storage solutions chosen to fit your new decluttered lifestyle. Make the change now and enjoy a peaceful, beautiful home every day.
Frequently Asked Questions
How can I quickly gather supplies for decluttering?
Gather sturdy garbage bags, large storage bins with lids, heavy-duty markers, cleaning supplies, microfiber towels, and a vacuum cleaner. Having these items ready ensures a smooth decluttering process.
What is the best way to sort items while decluttering?
Use four distinct containers to categorize items: Keep (necessary items), Donate (good condition items), Sell (valuable items), and Trash (broken or unusable items). This clear categorization helps streamline the decision-making process.
How long should my decluttering sessions be?
Set a timer for 15 to 30 minutes for each decluttering session. This duration is effective for maintaining motivation and making significant progress without overwhelming yourself.
How can I maintain my decluttered space?
Establish a maintenance plan that includes daily resets, weekly deep cleans, monthly organizational checks, and an annual comprehensive review. Involve your entire household in the plan to make it a collaborative effort for sustained organization.

