
Dorm rooms can feel cramped and chaotic before you even unpack your first box. Students are often shocked to realize that college spaces can be smaller than 130 square feet per person. Most people respond by cramming everything they own into any available corner. But the secret to creating a calm and productive living space is not what you bring with you, but how you organize what actually fits.
Table of Contents
- Step 1: Assess Your Current Storage Needs
- Step 2: Purge Unnecessary Items
- Step 3: Plan Your Dorm Room Layout
- Step 4: Select Stylish Storage Solutions
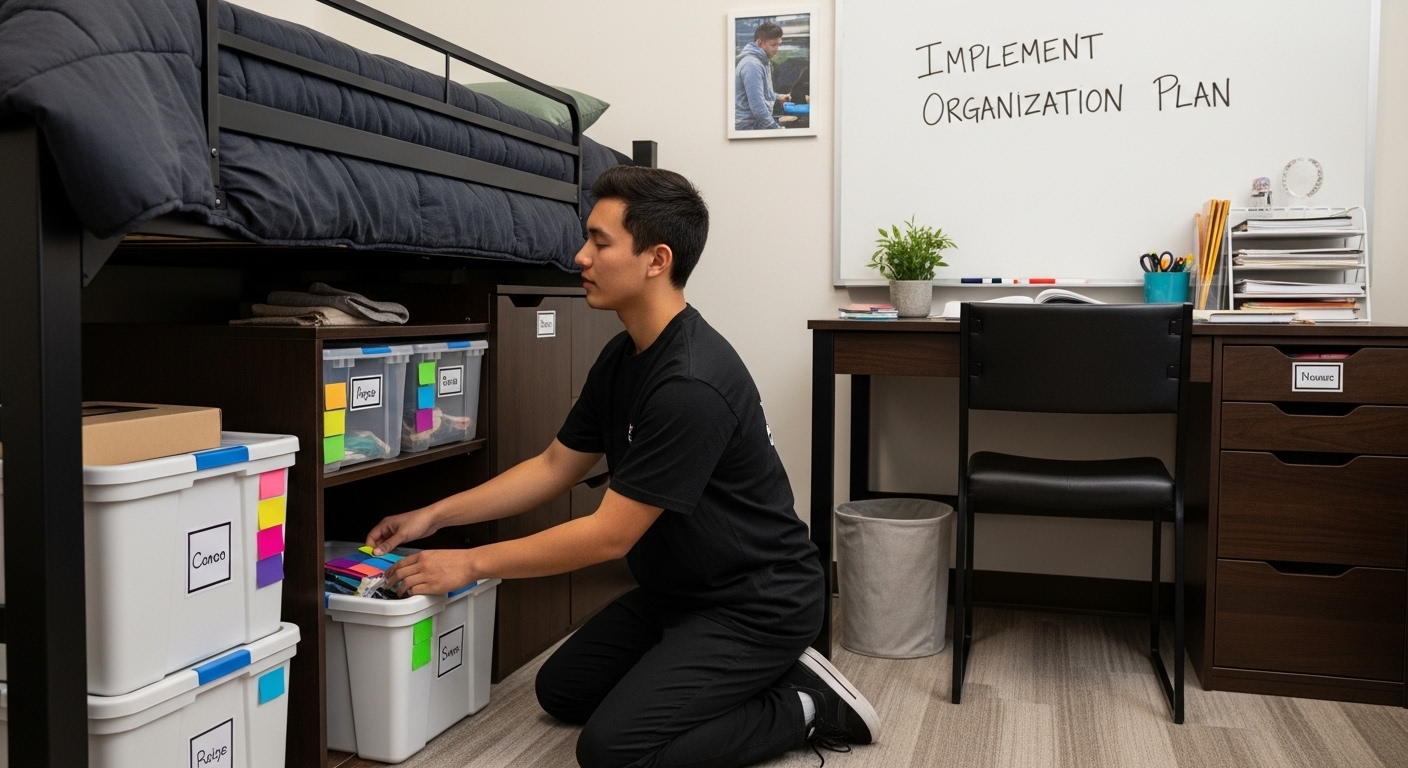
- Step 5: Implement Your Organization Plan
- Step 6: Evaluate And Adjust Your Setup
Quick Summary
| Key Point | Explanation |
|---|---|
| 1. Assess your storage needs first | Conduct a thorough inventory of all belongings to understand what you need to store and where. |
| 2. Purge unnecessary items efficiently | Sort belongings into keep, donate, or discard categories to reduce clutter and make space for essentials. |
| 3. Plan your dorm room layout strategically | Create a detailed layout that maximizes vertical space and defines functional zones for studying and relaxing. |
| 4. Select multifunctional storage solutions | Choose furniture and storage items that serve multiple purposes, ensuring both style and function are prioritized. |
| 5. Regularly evaluate and adjust your setup | Periodically assess your organization system and adapt it to match changes in your academic and personal life needs. |
Step 1: Assess Your Current Storage Needs
Dorm room organization begins with a strategic and honest assessment of your current storage situation. Before purchasing any organizational tools or rearranging furniture, you need to understand exactly what storage challenges you’re facing. This initial step is crucial because it sets the foundation for creating a clutter free and functional living space.
Start by conducting a comprehensive inventory of your belongings. Empty out your closet, drawers, and any existing storage spaces. Spread everything on your bed or floor to get a clear visual of exactly what you own. This process might feel overwhelming, but it’s essential for understanding your true storage needs. Categorize your items into groups like clothing, academic materials, personal accessories, electronics, and miscellaneous items.
As you sort through your belongings, be brutally honest about what you actually need. College spaces are notoriously small, so every inch of storage matters. Consider which items are truly essential and which can be stored elsewhere or eliminated entirely. Look for items that serve multiple purposes or can be compactly stored. For instance, clothing that can be rolled instead of folded, or items that can be vacuum sealed to reduce volume.
Carefully measure your available storage spaces including closet dimensions, drawer sizes, under bed clearance, and wall spaces. Check out our guide on maximizing small space storage to understand how strategic measurements can transform your organizational approach. Take detailed notes and photographs of your space to reference when selecting storage solutions.
The key verification for completing this step is having a clear, organized inventory of your belongings and precise measurements of your available storage areas. You should now have a comprehensive understanding of what storage solutions will work best for your specific dorm room layout and personal needs.
Step 2: Purge Unnecessary Items
Purging unnecessary items is the critical next phase in achieving a well-organized dorm room. This step goes beyond simple tidying and requires a disciplined approach to eliminating clutter that weighs down your living space and mental energy. By strategically reducing your belongings, you create room for what truly matters and establish a foundation for efficient storage.
Begin by creating three distinct sorting categories: keep, donate, and discard. Be ruthlessly pragmatic about each item’s utility and frequency of use. Clothing you have not worn in the past academic semester, duplicate electronics accessories, outdated textbooks, and random accumulated trinkets should be prime candidates for removal. Remember that college is a transient period, and every item you keep must earn its place in your limited space.
As you sort through your belongings, ask yourself strategic questions. Will this item serve a purpose in the next six months? Does it hold significant sentimental value? Can it be easily replaced if needed? Learn more about efficient home organization strategies to refine your decision making process. For academic materials, consider selling used textbooks, donating them to campus book drives, or sharing with future students to reduce physical clutter.
Digital decluttering is equally important. Review your electronic files, delete unnecessary downloads, organize cloud storage, and clear smartphone memory. This digital purge complements your physical space organization, creating a comprehensive approach to minimalism. Consider cloud storage or external hard drives for important documents to free up device space.
Verification for this step involves having three distinct piles: a compact “keep” collection that fits comfortably in your measured storage spaces, a donation bag ready for campus charity drives, and a small trash pile for items beyond reuse.
 Your goal is a streamlined collection of belongings that supports your academic and personal life without unnecessary weight.
Step 3: Plan Your Dorm Room Layout
Planning your dorm room layout is a strategic process that transforms limited space into a functional and comfortable living environment. This critical step requires careful consideration of every square inch, balancing functionality with personal style. Maximize vertical space and create multipurpose zones that serve your academic and personal needs efficiently.
Start by creating a detailed sketch or digital layout of your room. Measure each area precisely, including window locations, door swing, and electrical outlet positions. Consider the room’s natural traffic flow and identify potential storage opportunities. Beds often consume significant space, so explore options like lofting or bunking to create additional floor area underneath for desks, storage units, or relaxation zones. Many colleges offer bed risers or official lofting kits that can dramatically increase your usable space.
Focus on creating distinct functional zones within your limited square footage. Designate specific areas for studying, sleeping, personal storage, and relaxation. Your desk should be positioned near electrical outlets for convenient device charging, with good lighting and minimal distractions. Explore professional bedroom storage techniques to optimize every corner of your living space. Position your storage solutions strategically to maintain clear pathways and prevent a cluttered appearance.
Consider your roommate’s layout preferences and coordinate your design approach. Communication is key to creating a harmonious shared space. Discuss storage boundaries, shared furniture placement, and potential compromises that benefit both occupants. Some rooms work best with beds on opposite walls, while others might benefit from an L shaped arrangement that creates individual personal spaces.
Verification for this step involves having a comprehensive room layout plan with clearly defined functional zones, measured and mapped storage solutions, and a realistic understanding of how your furniture and belongings will fit within the space. Your layout should feel intentional, allowing smooth movement and providing designated spots for all your essential items.
Step 4: Select Stylish Storage Solutions
Selecting stylish storage solutions transforms your dorm room from a chaotic space into an organized sanctuary that reflects your personality. Smart storage is about more than just functionality it’s about creating a living environment that supports your academic and personal lifestyle while looking aesthetically pleasing.
Begin by prioritizing storage solutions that serve multiple purposes. Invest in furniture pieces that offer hidden storage compartments such as ottomans with interior space, bed risers with built in drawers, or compact shelving units that can double as room dividers. These multifunctional items maximize your limited dorm room square footage while maintaining a sleek, uncluttered appearance. Look for neutral color palettes that blend seamlessly with your existing decor, allowing flexibility as your style evolves throughout the academic year.
Discover innovative under bed storage techniques to utilize often overlooked spaces. Consider clear plastic containers with lids for storing seasonal clothing or academic materials, ensuring they are uniform in size and can be easily stacked. Choose containers with wheels for added mobility, allowing you to access items quickly without disrupting your entire storage system. Vertical hanging organizers work brilliantly for accessories, shoes, and smaller items that typically create visual clutter.
Prioritize storage solutions that are lightweight, durable, and easy to transport. Fabric storage cubes, collapsible bins, and modular shelving systems offer incredible versatility for college living. Select items that can be easily disassembled and moved between dorm rooms or during summer breaks. Consider the material carefully lightweight plastics and breathable fabrics prevent moisture buildup and potential mildew growth in compact living spaces.
Verification for this step involves having a comprehensive set of storage solutions that fit your measured space, match your personal style, and provide efficient organization. Your chosen items should seamlessly integrate into your room layout, creating a harmonious and functional living environment that supports your academic journey.
Step 5: Implement Your Organization Plan
Implementing your dorm room organization plan transforms carefully crafted strategies into tangible results. Execution is where most organizational efforts succeed or fail, so approach this step with patience and methodical precision. Begin by clearing your entire space completely, creating a blank canvas for your new organizational system.
Start with large furniture and storage pieces, positioning them according to your previously developed room layout. Ensure each item has a designated purpose and fits seamlessly into your planned zones. Utilize vertical space aggressively by installing wall mounted shelves, over door organizers, and hanging storage solutions that maximize every available inch. Explore innovative corner storage techniques to transform previously unused areas into functional storage spaces.
Organize your belongings systematically, grouping similar items together and placing them in their predetermined storage locations. Academic materials should have a dedicated study zone with easily accessible filing systems. Clothing can be arranged by type or frequency of use, with seasonal items stored in compact containers. Electronics and charging stations should be strategically placed near power outlets, using cable management solutions to prevent visual clutter and maintain a clean aesthetic.
Implement a color coding or labeling system to maintain your organizational structure. Use clear containers, label makers, or color coded tags to ensure every item has a specific home. This approach not only helps you maintain organization but also makes it easier to quickly locate items during busy academic weeks. Consider creating a small maintenance routine where you spend 10 minutes each evening returning items to their designated spaces, preventing gradual disorganization.
Verification for this step involves a comprehensive walkthrough of your newly organized space. Each item should have a clear, logical storage location. Your room should feel spacious, with clear pathways and minimal visual clutter. Test your system by simulating daily activities like studying, changing clothes, and preparing for classes. If you can smoothly navigate and quickly locate items, your implementation is successful.
Step 6: Evaluate and Adjust Your Setup
Evaluating and adjusting your dorm room organization is an ongoing process that ensures your living space remains functional and adaptable to changing academic and personal needs. Organizational systems are living solutions, not static arrangements that remain unchanged throughout the semester. Set aside dedicated time every few weeks to critically assess how your current setup is working and make necessary modifications.
Begin by documenting your current organizational approach through photographs and written notes. Create a simple tracking system that helps you identify which storage solutions are working effectively and which areas continue to create challenges. Pay attention to frequently cluttered zones, items that consistently end up in the wrong places, and storage containers that are underutilized or consistently overflowing. Learn more about maintaining efficient home organization to refine your approach continuously.
Consider the rhythm of your academic life when making adjustments. Your organizational needs will shift with changing class schedules, project requirements, and semester progression. Midterms and finals might require more study materials accessible, while breaks might allow for more comprehensive reorganization. Be flexible and willing to completely reimagine your storage solutions if they are not serving your current lifestyle. This might mean investing in new storage containers, rearranging furniture, or developing more sophisticated sorting systems for academic materials.
Communicate with your roommate during this evaluation process, ensuring that any adjustments respect shared spaces and mutual living arrangements. Some changes might require collaborative decision making, especially when modifying communal areas or shared storage zones. Be open to feedback and willing to compromise while maintaining your organizational goals.
Verification for this step involves creating a comprehensive assessment document that tracks your organizational evolution. This document should include before and after photographs, notes on what worked and what didn’t, and specific action items for future improvements. A successful evaluation results in a more streamlined, efficient living space that adapts to your changing academic and personal requirements.
Use the checklist below to verify successful completion of each dorm organization stage, helping you track progress and ensure essential tasks aren't overlooked before moving on.
| Stage | Verification Criteria | How to Confirm Completion |
|---|---|---|
| Assess Storage Needs | Organized inventory, space measurements | Itemized list and photos of all belongings and dimensions |
| Purge Unnecessary Items | Three distinct piles: keep, donate, discard | Only essential items remain and donation/trash bags are ready |
| Plan Room Layout | Clear layout plan, zones defined | Sketch/digital map labeling each function and storage location |
| Select Storage Solutions | All containers/furniture fit and match needs | Storage items match room dimensions, style, and function |
| Implement Plan | Logical placement, clear paths, minimal clutter | Functional walkthrough: quickly find and access essentials |
| Evaluate & Adjust | Documentation of changes, identified problem areas | Photos/notes comparing setups, action items for tweaks |
Transform Your Dorm with Smart Storage Solutions
Tired of the constant clutter in your dorm room? If you struggle with overflowing closets, scattered textbooks, and cramped quarters, you are not alone. The article shows how critical it is to assess storage needs, use every inch wisely, and select space-saving solutions.
Below is a dorm room organization step overview table for quick reference, summarizing the main actions, key focuses, and results from each phase of the process.
| Step | Key Focus | Main Action | Desired Outcome |
|---|---|---|---|
| 1. Assess Storage Needs | Inventory belongings | Measure and categorize items | Clear picture of storage needs and available space |
| 2. Purge Unnecessary Items | Declutter | Sort into keep, donate, discard | Streamlined, essential belongings only |
| 3. Plan Layout | Spatial planning | Sketch and arrange functional zones | Maximized space with clear zones |
| 4. Select Storage Solutions | Multifunctional organization | Choose space-saving storage items | Stylish, efficient storage tailored to needs |
| 5. Implement Plan | Systematic setup | Position furniture and organize belongings | Functional, organized living space |
| 6. Evaluate & Adjust | Ongoing optimization | Review and document setup | Continually adapted and improved system |
| Now you can move beyond the basics with high-quality products designed for small spaces. Visit our Bedroom Storage page to see storage boxes, baskets, and organizers tailored for dorm organization. These products make it simple to sort your belongings and keep your space neat all semester. |

Take your organization plan from theory to reality. Browse the latest offers at BLUSHBEES USA and discover student-friendly options that combine strength with style. Make your dorm clutter-free today and enjoy a calm, inviting space that feels like home. Shop now for deals and create a room that works for you.
Frequently Asked Questions
What are the best initial steps for organizing a dorm room?
Start by assessing your current storage needs. Conduct a thorough inventory of your belongings and categorize them to understand your true storage challenges. Measure available storage spaces to effectively plan for organization.
How can I effectively purge unnecessary items from my dorm room?
Create three categories: keep, donate, and discard. Be honest about each item’s utility and frequency of use. Focus on items that you haven’t used recently and consider donating or discarding items that clutter your space.
What strategies can I use to maximize storage in my dorm room?
Utilize vertical space by installing shelves and hanging storage solutions. Choose multifunctional furniture, like ottomans with hidden storage. Consider under-bed storage options and ensure every item has a designated home to keep the space organized.
How often should I evaluate my dorm room organization?
Regularly assess your organization every few weeks. Document your current setup and identify areas that need adjustments as your academic and personal needs change. This ongoing evaluation helps maintain a functional living environment.

